Connect Gradial’s AI agents to Sitecore XP to automate content creation, updates, and publishing on your on-premises or managed environment.
Gradial connects to Sitecore XP by running a lightweight Service Gateway module inside your CM’s IIS process. The gateway exposes a secured REST API at /_api/gradial/* that Gradial agents call to read items, apply edits, and trigger publishing — all without VPN tunnels, additional servers, or schema changes to your Sitecore databases.Authentication uses short-lived JWT bearer tokens issued by your existing OIDC provider (Sitecore Identity Server or a third-party IdP like Azure AD, Okta, or Keycloak). Gradial exchanges a client secret for a token on every request, so no long-lived credentials are stored on the CM server.
This page covers the on-premises / managed Sitecore XP integration. For Sitecore XM Cloud or Content Hub, see the Sitecore overview.
A Sitecore XP 10.0–10.4 CM instance reachable over HTTPS
Administrator access to the CM to install files and create a service user
Access to your OIDC provider (Sitecore Identity Server or equivalent) to register a client
A Gradial account with permission to create integrations under Settings → Integrations
The setup takes around 30 minutes for a straightforward deployment. Allow extra time if your environment uses split-horizon networking or a non-standard identity provider.
Enter the connection details and credentials in Gradial to go live
When you are done, Gradial talks to your CM over HTTPS at /_api/gradial/*, authenticated by short-lived JWT bearer tokens issued by your OIDC provider via the client-credentials grant.
The gateway ships as two DLLs and a config patch. It runs in-process inside the Sitecore CM IIS app domain — no separate service, no database changes, no schema updates.Supported versions: Sitecore XP 10.0, 10.1, 10.2, 10.3, 10.4 (CM role).Gradial provides the gateway in three formats. Pick the one that matches how you deploy Sitecore — all three land the same files in the CM webroot, after which you complete the shared post-install steps.
Sitecore package (wizard)
WDP (Azure / Web Deploy)
Drop-in zip (manual copy)
Best for a one-off manual install by a Sitecore administrator on a running CM.Artifact:Gradial.Gateway.Module-<version>-sc10.zip
1
Open the Installation Wizard
In the Sitecore Desktop, go to Sitecore → Development Tools → Installation Wizard (or Control Panel → Administration → Install a package).
2
Upload the package
Choose Upload package, select Gradial.Gateway.Module-<version>-sc10.zip, and upload it, then click Next.
3
Install
Step through the wizard and click Install. The package writes the module binaries (bin\Gradial.SitecoreXP.Gateway.*.dll, bin\Swashbuckle.Core.dll) and the config patch (App_Config\Include\Gradial\) into the webroot. On an upgrade, accept the file-overwrite prompts.
4
Restart when prompted
If the wizard offers to restart the Sitecore client or application, allow it so the new assemblies load.
Best for automated CI/CD into Azure App Service or any Web Deploy–based pipeline. You download the package from your Gradial release and add it as a step in your own pipeline — Gradial does not deploy into your environment for you.Artifact:Gradial.Gateway.Module-<version>-sc10.scwdp.zip
1
Add the package to your pipeline artifacts
Download Gradial.Gateway.Module-<version>-sc10.scwdp.zip from your Gradial gateway release and store it alongside your other Sitecore deploy artifacts.
2
Apply it with Web Deploy
Add a Web Deploy step that syncs the package to your CM web app. In Azure DevOps, use the Azure App Service deploy task with the .scwdp.zip as the package. Or call msdeploy directly:
Run the pipeline. Web Deploy lands the module binaries and config patch in the CM webroot and replaces any previous version cleanly on redeploy.
The WDP is built with the Sitecore Azure Toolkit and mirrors the same webroot layout as the other formats. It contains only the module binaries and configuration — no content items and no database changes.
Best when you deploy by copying files directly into the webroot (e.g. a scripted release).Artifact:Gradial.SitecoreXP.Gateway-<version>-sc10.zip
1
Stop the CM application pool
Stop the Sitecore CM application pool before copying files.
2
Unzip into the webroot
Unzip Gradial.SitecoreXP.Gateway-<version>-sc10.zip into the Sitecore CM webroot (e.g. C:\inetpub\wwwroot\<instance>\). The archive mirrors the webroot layout:
Once the files are in the webroot, finish the setup the same way regardless of install method:
1
Start (or restart) the CM application pool
This loads the gateway assemblies. GET https://<cm-host>/_api/gradial/health should now return 200 OK. (Authenticated endpoints return 503 until you configure identity in the next step.)If you get 404, the gateway did not initialize — check the Sitecore log for [Gradial.Gateway] entries during app pool startup.
2
Configure identity (setup page)
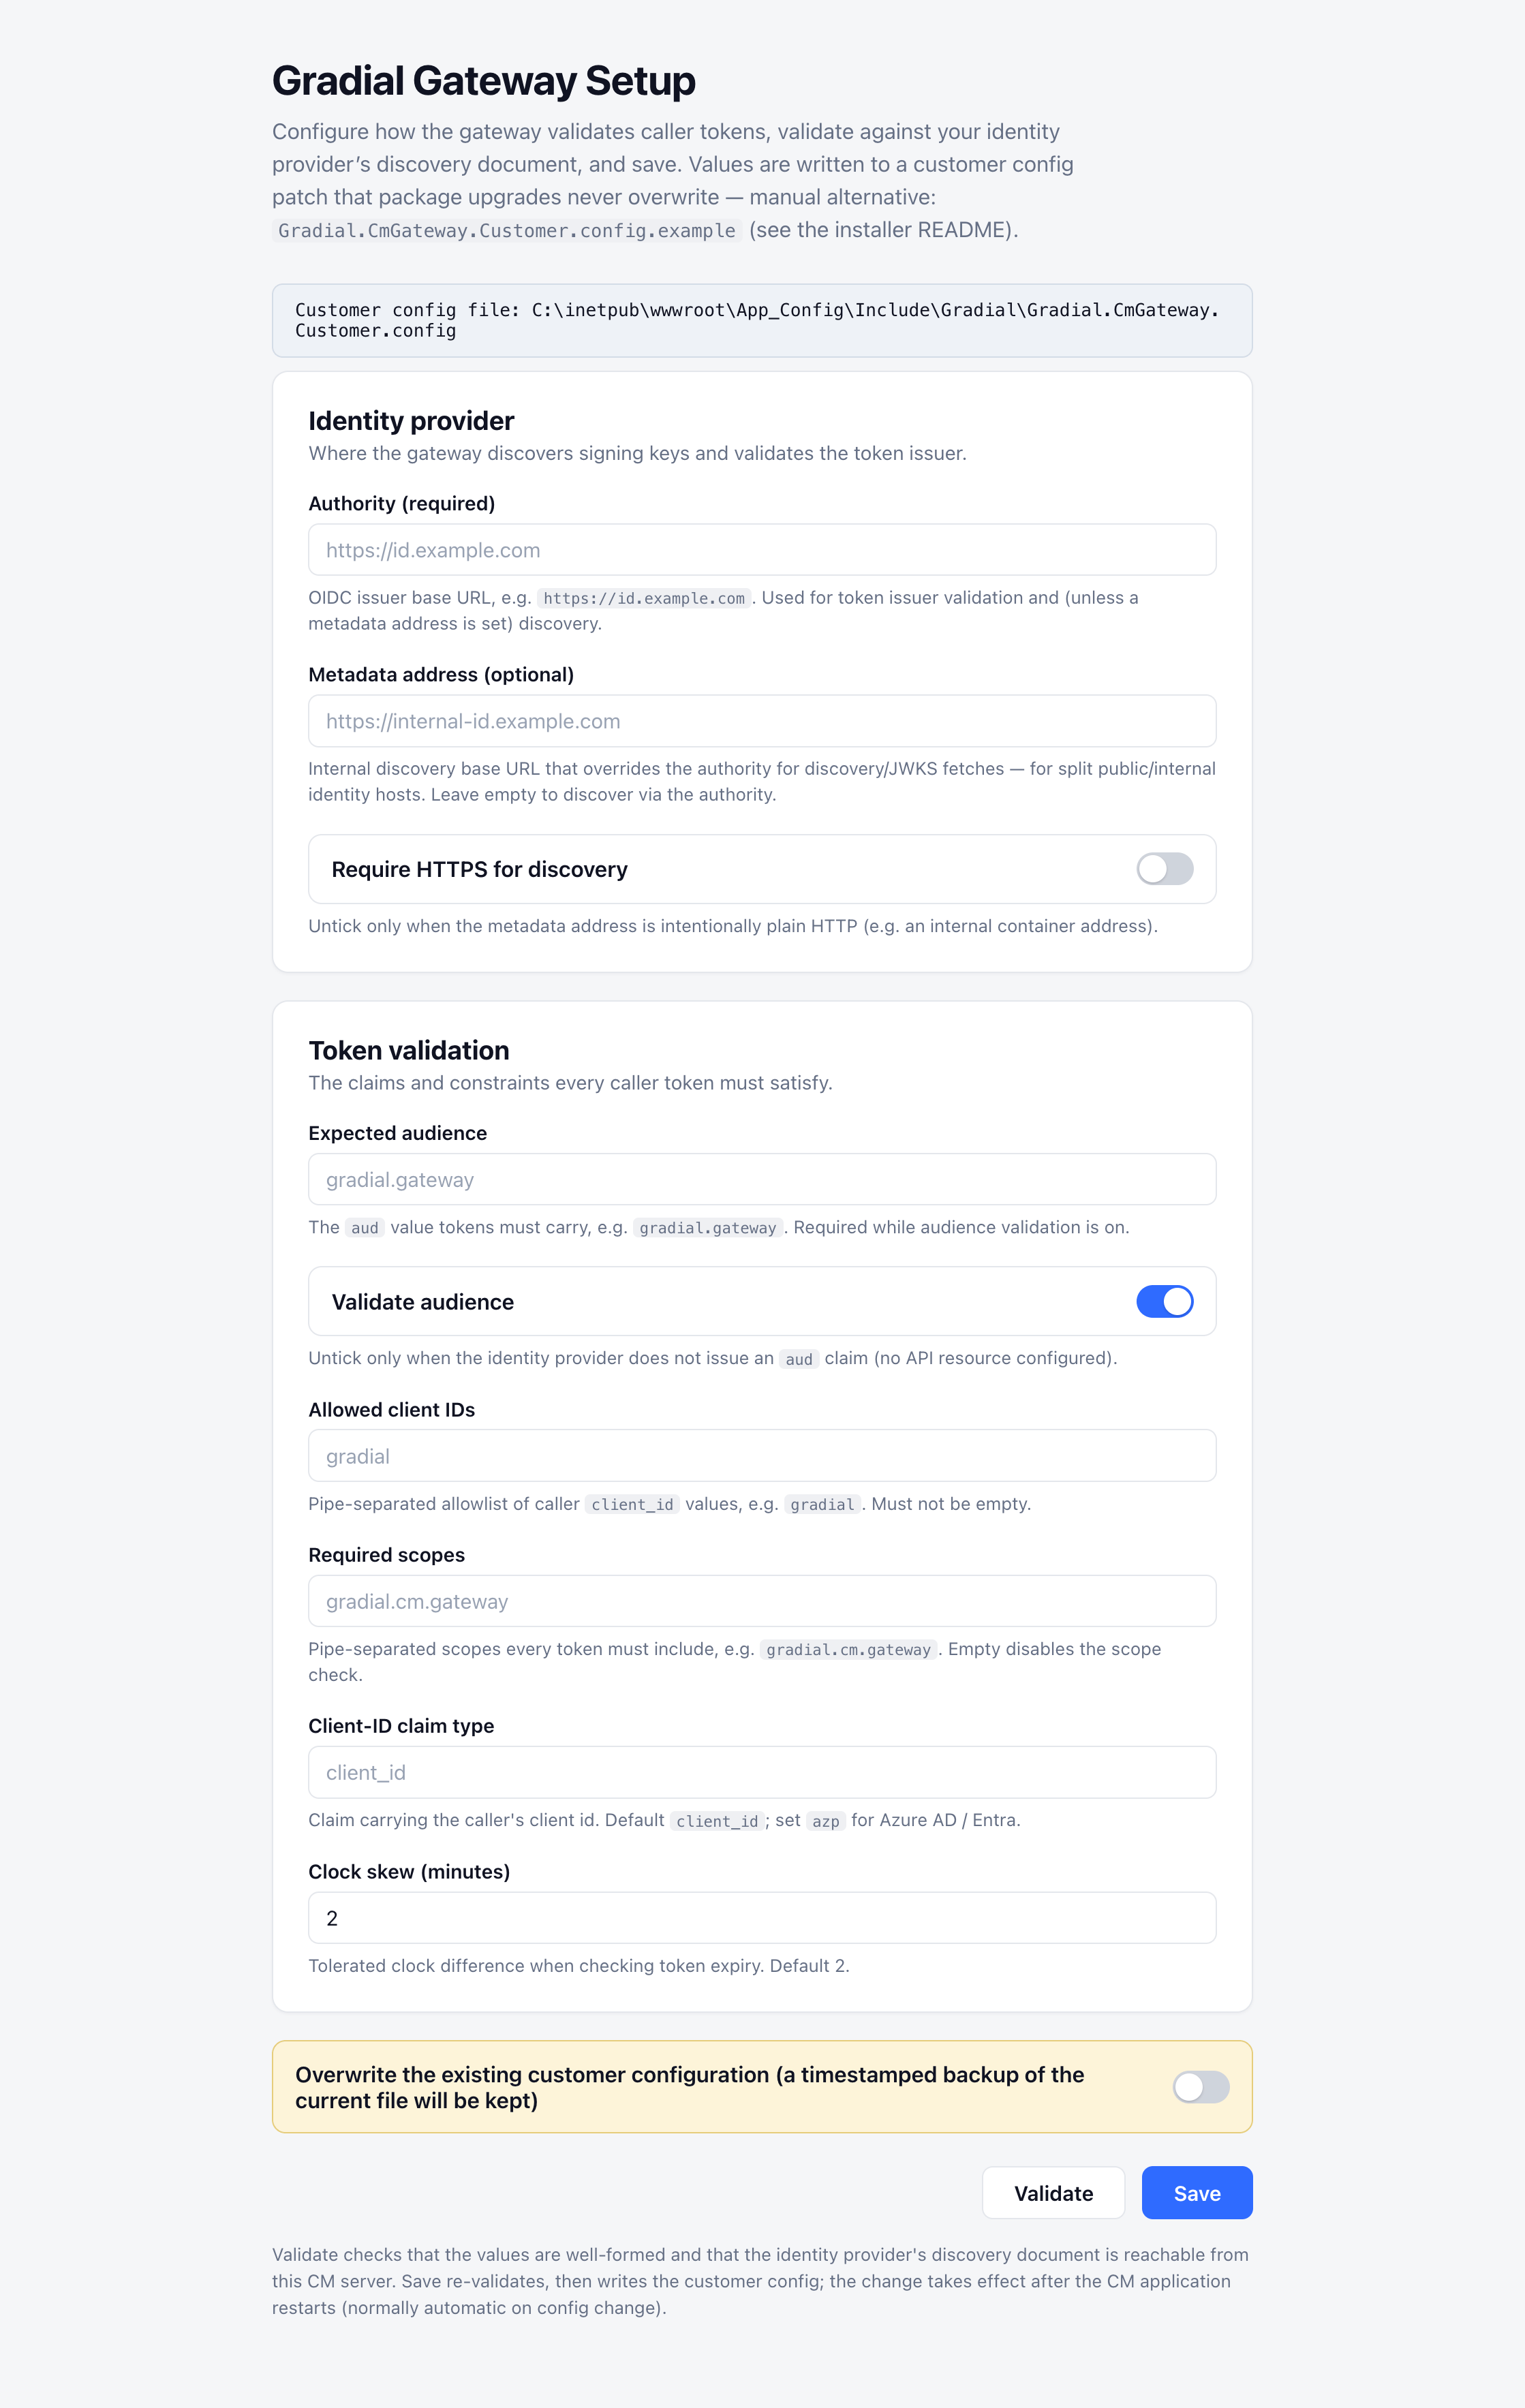
Browse to /sitecore/admin/Gradial.Setup.aspx on the CM (Sitecore administrator login required) and enter your OIDC values — Authority, Expected audience, Allowed client IDs, and Required scopes (from Section 2); set the optional Metadata address / discovery options only for split-horizon setups. Click Validate to confirm the values are well-formed and that your identity provider’s discovery document is reachable from the CM, then Save.
The Gradial Gateway setup page validates against your identity provider and writes an upgrade-safe customer config patch.
Save writes the values to App_Config\Include\Gradial\Gradial.CmGateway.Customer.config — a customer patch that package upgrades never overwrite — and the CM recycles automatically to apply them.
Containerized CM (Docker / Kubernetes / any topology where the CM is recreated from an image): the webroot — including App_Config — is an ephemeral container layer, so the file this page writes does not survive a container recreate. When it vanishes, gateway authentication breaks with 503 Identity provider unavailable. On containers, treat this page as a validation and smoke-test tool (the Validate button’s live discovery probe is still the fastest way to confirm the CM can reach your identity provider): make the durable configuration an install-settings.json on a persistent volume, or GRADIAL_IDENTITY_* environment variables in your compose file/manifest — both are re-applied automatically on every CM start.Precedence note: when install-settings.json or GRADIAL_IDENTITY_* variables are present, they are authoritative on every CM start for the settings they supply — values saved through this page for those same settings are overwritten at the next app-pool recycle.On a classic VM/IIS install the webroot is durable and this page is a perfectly good permanent configuration method.
Prefer configuration-as-code? You can supply the same identity values without the page: hand-edit the config patch (see Section 4), set GRADIAL_IDENTITY_* environment variables, or drop an install-settings.json in the Sitecore data folder — the last two are applied automatically on CM start. Non-identity settings such as Gradial.Security.AllowedDatabases are always edited in the config patch.
3
Create the service user and grant rights
Create the Sitecore user referenced by Gradial.Sitecore.ServiceUser (default sitecore\gradial-service) and grant the item-level rights in Section 3.
4
Verify end to end
Confirm GET https://<cm-host>/_api/gradial/health returns 200, then run the OIDC smoke test to confirm a real token is accepted.
Sitecore package / drop-in zip: stop the app pool, remove bin\Gradial.SitecoreXP.Gateway.*.dll, bin\Swashbuckle.Core.dll, and the entire App_Config\Include\Gradial\ folder, then restart the app pool.
WDP: remove the module step from your pipeline and redeploy, or delete the same files from the web app. The Gradial.CmGateway.Customer.config written by the setup page is not part of any package, so remove it by hand if you want the identity configuration gone too.
The gateway is an OAuth 2.0 resource server — it validates JWTs but never issues them. Token issuance is the job of your OIDC provider. You need to register three things there:
Concept
Purpose
API resource (audience)
Identifies the gateway as a protected resource. The token’s aud claim must match.
API scope
Permission name the caller must request to get a usable token.
Client
Gradial’s identity. Has a client_id + client_secret and is authorized for the scope above.
Gradial requests tokens with the client credentials grant and sends them on the Authorization: Bearer <token> header of every request.
Sitecore Identity Server is based on IdentityServer4 and accepts XML patch files mounted into its container. A complete Gradial registration:
<?xml version="1.0" encoding="utf-8"?><Settings> <Sitecore> <IdentityServer> <!-- The audience. Gateway's ExpectedAudience must equal Name. --> <ApiResources> <GradialGatewayResource> <Name>gradial.gateway</Name> <DisplayName>Gradial CM Gateway</DisplayName> <Scopes> <Scope1>gradial.cm.gateway</Scope1> </Scopes> </GradialGatewayResource> </ApiResources> <!-- The scope. Gateway's RequiredScopes must contain Name. --> <ApiScopes> <GradialCmGatewayScope> <Name>gradial.cm.gateway</Name> <DisplayName>Gradial CM Gateway Access</DisplayName> </GradialCmGatewayScope> </ApiScopes> <!-- One client per calling tool. Gateway's AllowedClientIds must contain ClientId. --> <Clients> <GradialClient> <ClientId>gradial</ClientId> <ClientName>Gradial Gateway Client</ClientName> <AccessTokenType>0</AccessTokenType> <AccessTokenLifetimeInSeconds>3600</AccessTokenLifetimeInSeconds> <RequireClientSecret>true</RequireClientSecret> <AllowOfflineAccess>false</AllowOfflineAccess> <AllowedGrantTypes> <AllowedGrantType1>client_credentials</AllowedGrantType1> </AllowedGrantTypes> <ClientSecrets> <ClientSecret1>$(env:GRADIAL_CLIENT_SECRET)</ClientSecret1> </ClientSecrets> <AllowedScopes> <AllowedScope1>gradial.cm.gateway</AllowedScope1> </AllowedScopes> </GradialClient> </Clients> </IdentityServer> </Sitecore></Settings>
Place this in the Identity container’s config directory (typically Config/production/ or via a mounted volume) and restart the container.
If you use a different OIDC provider (Azure AD, Okta, Auth0, Keycloak, etc.), the concepts are identical — register an API resource, an API scope, and a client-credentials client, then map the four values into the gateway’s config.
Split-horizon networks (internal vs. public issuer)
MetadataAddress exists for the case where the ID server has a different internal origin than the JWT’s public issuer URL. In simple deployments where the CM can reach the same URL clients use, leave MetadataAddress empty and the gateway will derive everything from Authority.This split is common in containerized deployments. For example:
The Sitecore Identity container is reachable from the CM container at http://id (an internal Docker DNS name, plain HTTP).
The same Identity service is reachable from the public internet at https://id.example.com (TLS, public DNS).
Tokens issued to Gradial carry iss: https://id.example.com because that’s the issuer the public clients trust.
In this case:
Setting
Value
Why
Gradial.Identity.Authority
https://id.example.com
Must match the JWT’s iss claim. The gateway compares this string to the token’s issuer during validation.
Gradial.Identity.MetadataAddress
http://id
Base URL the gateway uses to fetch the discovery document and signing keys. Use the internal hostname the CM container can actually reach. The gateway appends /.well-known/openid-configuration automatically — do not include that suffix here.
Gradial.Identity.DiscoveryRequireHttps
false
Required when MetadataAddress is plain HTTP. Leave true when both URLs are HTTPS.
Never set Authority to the internal URL. The gateway validates the token’s iss claim against Authority, and the issuer baked into the token is the public URL — using the internal URL there will fail every token with a 401.
Do not use GUIDs, Get-Random, or human-friendly password generators — they have insufficient entropy.
Store the plaintext secret in a secret manager. Inject it into the Identity container as an environment variable (the sample above reads $(env:GRADIAL_CLIENT_SECRET)). Provide the same plaintext value to Gradial when you create the integration.
The gateway executes every Sitecore operation as the configured service user (Gradial.Sitecore.ServiceUser, default sitecore\gradial-service). The OIDC client identity authorizes Gradial to call the gateway; the Sitecore user is what actually reads and writes content in Sitecore. Sitecore’s audit trail records this user, not the JWT caller — the gateway logs the JWT caller separately, with a correlation ID joining the two streams.
Grant the minimum item-level rights for the content roots the integration will operate against. Replace [TENANT] and [SITE] with your actual values; repeat for every tenant/site you want to expose.
Path
Rights
Notes
/sitecore/content/[TENANT]/[SITE]
Read, Write, Create, Delete, Rename
Content tree the integration will manage.
/sitecore/media library/Project/[TENANT]/[SITE]
Read, Write, Create, Delete, Rename
Media items associated with the same site.
/sitecore/templates
Read
Required so the gateway can resolve field definitions when reading or creating items. Do not grant Write — content operations should never mutate templates.
Apply rights with inheritance (“Descendants”) so child items inherit them. Use the Sitecore Security Editor (Desktop → Security Tools → Security Editor), or assign the user to a role that carries these rights.
The Sitecore ACLs above on the service user — anything outside the granted scope returns 403 from the underlying SDK.
The consuming application’s allowed-paths configuration (set in Gradial).
Database-level access is enforced separately by the Gradial.Security.AllowedDatabases setting. Requests targeting a database outside the allowlist are rejected before any Sitecore call is made. The setting fails closed — an empty allowlist denies all requests.
All settings live in App_Config\Include\Gradial\Gradial.CmGateway.config. Most defaults are correct out of the box; only the identity values are required.
OIDC issuer URL. The token’s iss claim must match.
Gradial.Identity.ExpectedAudience
(empty — required)
Value the token’s aud claim must equal.
Gradial.Identity.ValidateAudience
true
Disable only for diagnostics. Keep true in production.
Gradial.Identity.AllowedClientIds
gradial
Pipe-separated list of client IDs allowed to call the gateway (e.g. gradial|tool-b). The token’s client_id claim must appear here.
Gradial.Identity.RequiredScopes
gradial.cm.gateway
Pipe-separated list of scopes the token must contain.
Gradial.Identity.ClockSkewMinutes
2
Allowance for clock drift between the OIDC issuer and CM server.
Gradial.Identity.ClientIdClaimType
client_id
Claim name used to read the client ID from the token. Override only if your provider emits a non-standard claim.
Gradial.Identity.MetadataAddress
(empty)
Base URL for OIDC discovery and JWKS fetches. The gateway appends /.well-known/openid-configuration itself, so the value is just an origin (e.g. http://id) — not a full discovery URL. Leave empty to reuse Authority. Set this only when the CM cannot reach Authority directly; see Split-horizon networks.
Gradial.Identity.DiscoveryRequireHttps
true
Enforces HTTPS for the discovery endpoint. Only set false for local development against a non-TLS Identity host.
After saving, Gradial will fetch a token via the client-credentials grant and call /_api/gradial/health and /_api/gradial/whoami to verify the connection end-to-end.
Authority mismatch, signing key not loadable, or ExpectedAudience doesn’t match the token’s aud claim.
403 Forbidden with insufficient_scope
Token doesn’t include a scope listed in RequiredScopes.
403 Forbidden with client not allowed
Client ID isn’t in AllowedClientIds.
403 Forbidden on item operations
Service user lacks the required rights on the requested path. Review Section 3.
503 Service Unavailable on authenticated endpoints
Authority is empty or the gateway can’t reach the discovery document at MetadataAddress.
404 Not Found on /_api/gradial/*
Gateway didn’t initialize. Check the Sitecore log for [Gradial.Gateway] errors during app pool startup.
All gateway log entries are tagged [Gradial.Gateway] and include a correlation ID. When opening a support case, include the correlation ID from the failed request’s X-Correlation-Id response header.
Was this page helpful?
Assistant
Responses are generated using AI and may contain mistakes.